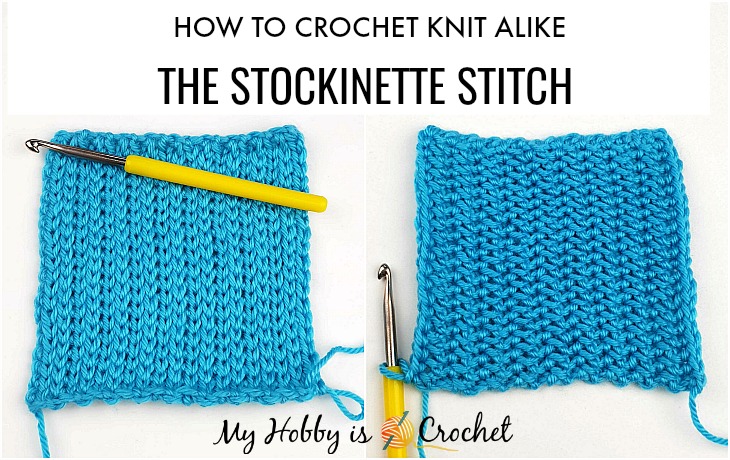
I have been playing with some crochet stitches and I think that I made a great discovery! For me, at least! :) So, if you love the look of the knit Stockinette Stitch, this tutorial might be just something for you!
*Disclaimer: This post includes affiliate links and at no additional cost to you, I might earn a small commission if you decide to purchase through these links. Thank you!
The yarn was provided by Red Heart Yarns.
How to Crochet Knit Look Stockinette Stitch with the Yarn Over Slip Stitch
Written Instructions and Pictures Copyright © 2018 Kinga Erdem
First of all, let’s see what a Knit Stockinette Stitch is and how it looks!
I haven't knitted in years, but for the sake of this tutorial, I have knitted a few rows in Stockinette Stitch. :)
As you can see in the picture above, the Knit Stockinette has 2 sides: a right and a wrong side of work.
On the Right Side of work the stitches look like small Vs and are called knit sts.
On the Wrong Side the stitches are bumpy and are called purl sts or reverse stockinette.
To knit Stockinette stitch, you will alternate one knit row with one purl row.
I have obtained a similar look in crochet by manipulating a stitch that I call the yarn over slip stitch (yo-slst). In my previous posts I have shown you
a) how to crochet a yo-slst and how to work the yo-slst into the back loops only and
b) how to work the yo- slst into the 3rd. loop at the front.
b) how to work the yo- slst into the 3rd. loop at the front.
We saw that crocheting repeated rows of yo-slst-blo sts, will create a pretty Crochet Ribbing that resembles to the knit look ribbing (knit 1, purl 1).
This kind of ribbing can be obtained also when working repeated rows of yo-sl-sts into 3rd loop at front.
Now let me give you the great news! To Crochet a knit alike Stockinette stitch (with Vs at the front and purl look at the back) you will alternate one row of yo-slsts-blo with one row of yo-slsts into 3rd.loop at the front!
Once you'll flip your work to the vertical, you’ll see the magic happening in front of your eyes! Taadaa! Crochet Stockinette! I really love the crochet "purl" side.
Same as the knit Stockinette, the crochet version has a tendency to roll up a bit. That's why you should either block your crochet piece, or combine it with ribbing to prevent it from rolling.
Now let's see how it works!
STITCHES AND ABBREVIATIONS USED:
STITCHES AND ABBREVIATIONS USED:
- st: stitch
- blo: back loop only
- yo-slst-blo: yarn over slip stitch back loops only (See the Tutorial!)
- yo-slst 3rd loop at front: yarn over slip stitch into the 3rd loop at the front (See the Tutorial!)
- RS: right side
- WS: wrong side
-beg: beginning
For this tutorial I have used Red Heart Soft yarn and a 5 mm/ G hook!
CROCHET STOCKINETTE STITCH INSTRUCTIONS:
Start with a foundation chain of your desired length. Add 1 ch to turn. (For this tutorial I have chained 21 chains.)
Note: The ch1 at beg of rows will not be counted as a st.
Row 1 (Note: For a nice looking foundation edge, work the first row inserting the hook into the back bump of chains): work 1 yo-slst into the 2nd.ch from hook and 1 yo-slst into each ch across, turn
(I have 20 sts total)
Row 2 ("Knit" Row on RS): ch 1, work 1 yo-slst-blo in each st across, turn
(This will create the "knit v-sts")
Row 3 ("Purl" Row on WS): ch1, work 1 yo-slst into 3rd loop at front in each st across, turn
(This will push the "knit v-sts to the other side of the work!)
Repeat rows 2-3, always working yo-slst-blo on the right side and yo-slst into 3rd. loop on the wrong side!
I hope you enjoyed this tutorial! For more free crochet patterns and tutorials, please visit my FREE Crochet Pattern Page!
Happy Crocheting,
Kinga


